5 Essential Tips to Craft Vibrant Designs for Unlimited Colour Embroidery
Is your online store all about colour, creativity, and sharing your designs with the world? If so you're going to love what we've got in store for you! In this article we're sharing the top five essential tips for crafting vibrant embroidery designs with unlimited colour embroidery.
Want to get in quick and take advantage of our limited time offer?
To get started using this service, check out our full collection of products available with unlimited colour embroidery.
What is Unlimited Colour Embroidery?
Before we dive into how to make your designs, let's take a moment to explain what makes unlimited colour embroidery so special.
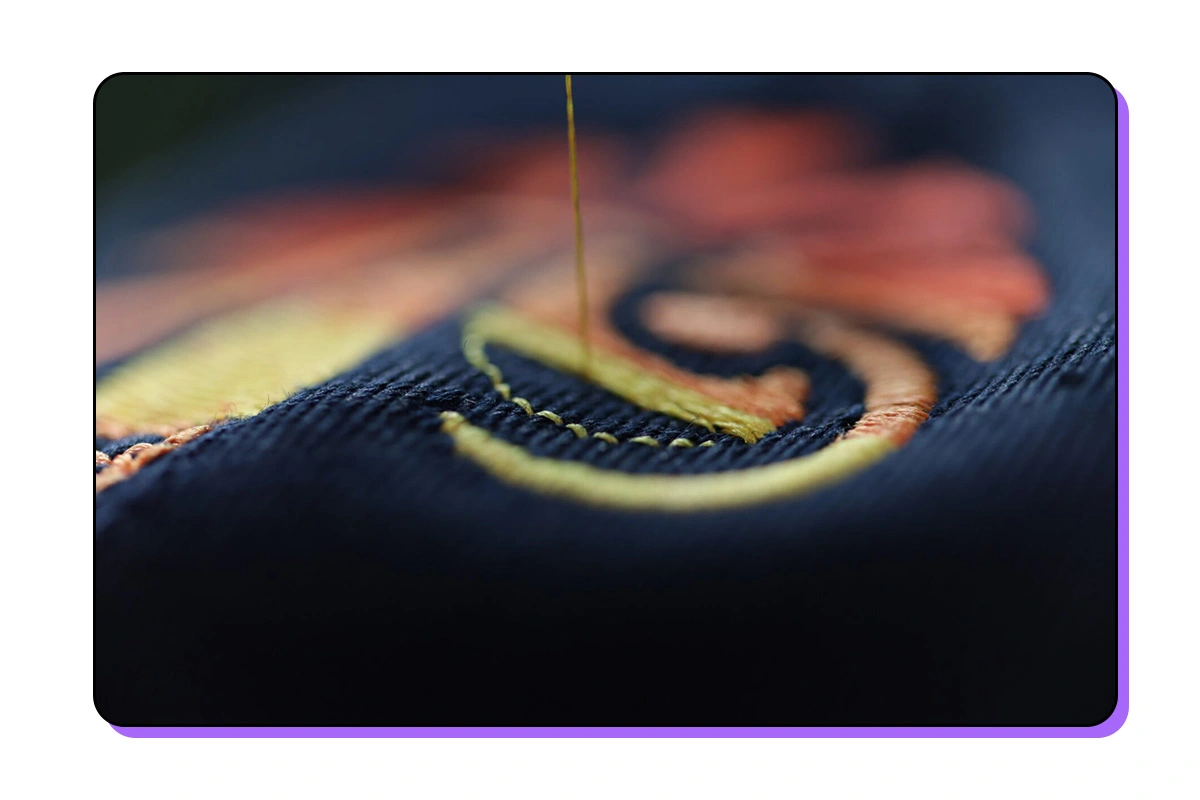
Enter Coloreel, the mastermind behind this game-changing technology that's been rocking the fashion world since its debut!
This innovative technology uses ink to dye the thread as per your design. This allows for an unlimited colour palette and colour matching, creating vibrant and in-depth designs that were previously impossible with traditional embroidery methods.
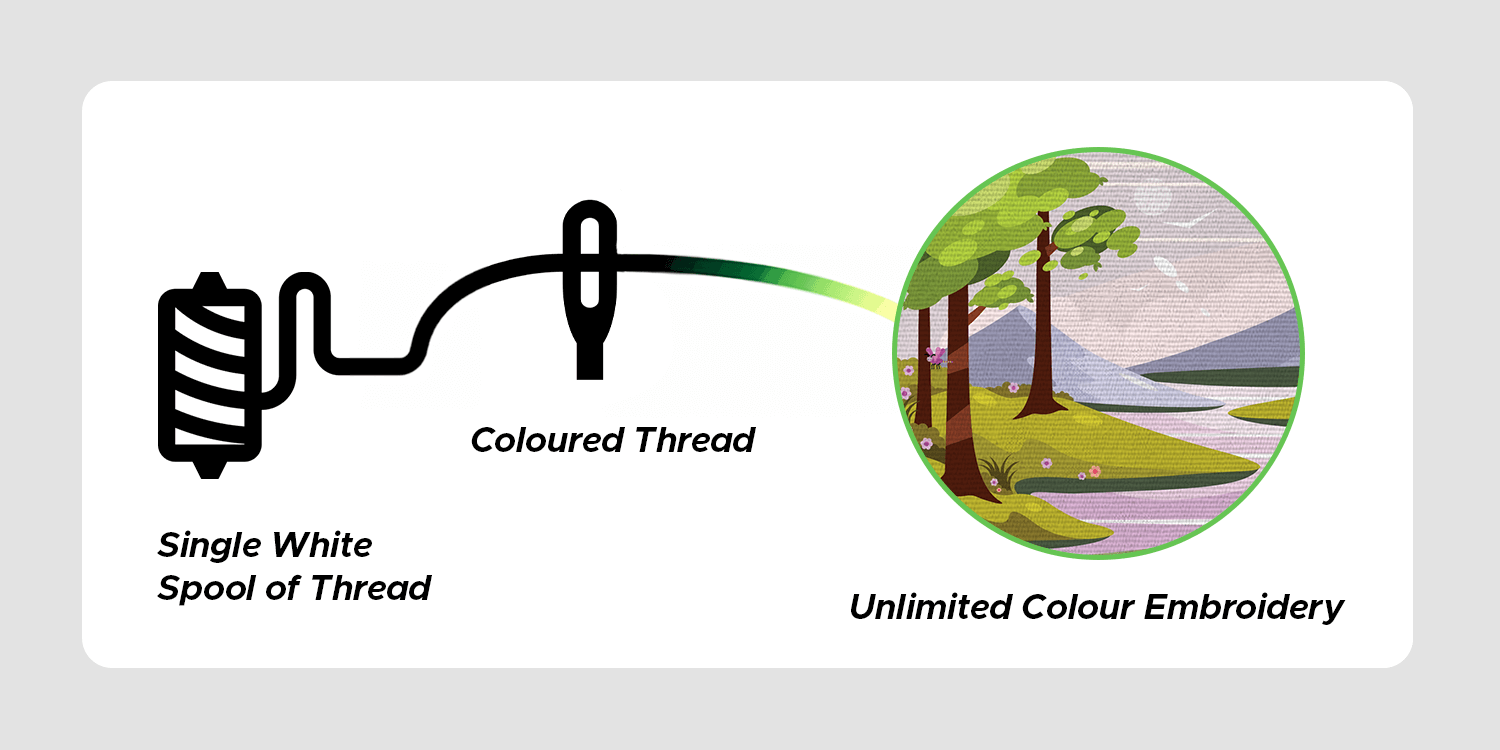
New techniques that you can employ as part of your designs include gradients, stripes and even multi-coloured shapes that can transition between colours seamlessly.
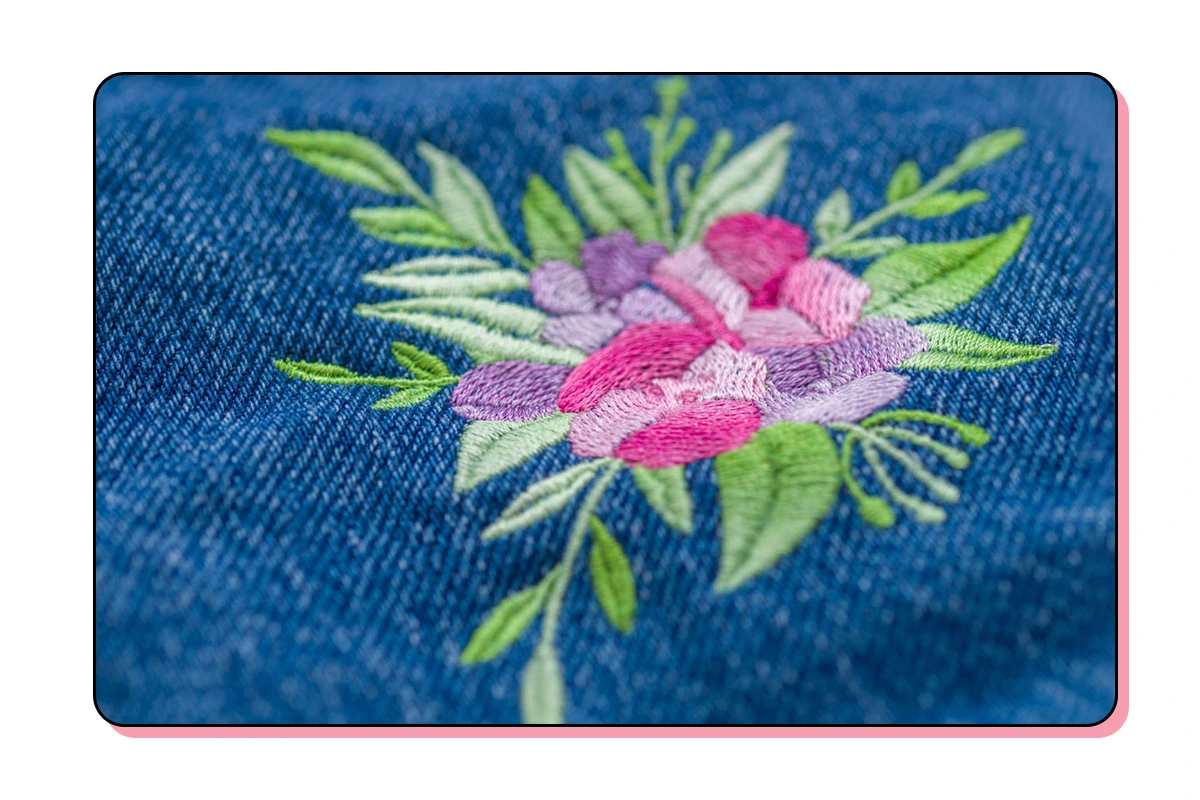
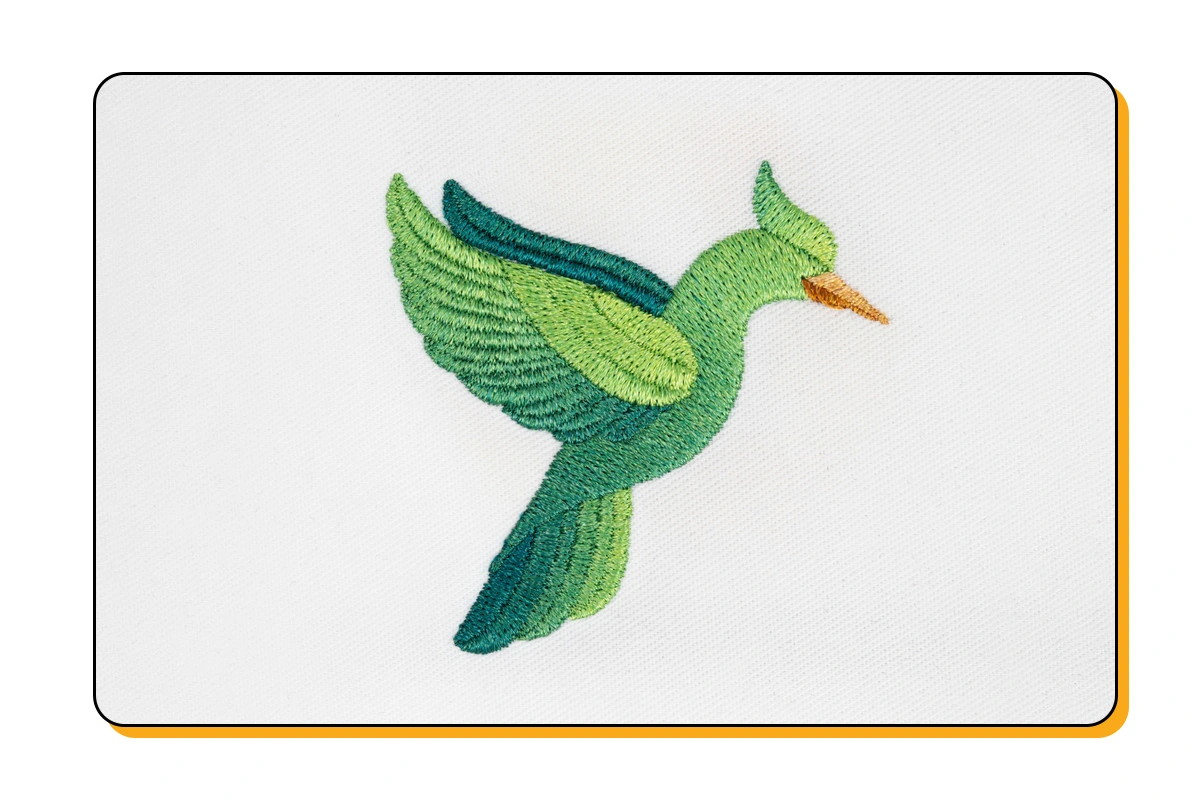
Here's some examples of what's possible using Unlimited Colour Embroidery:
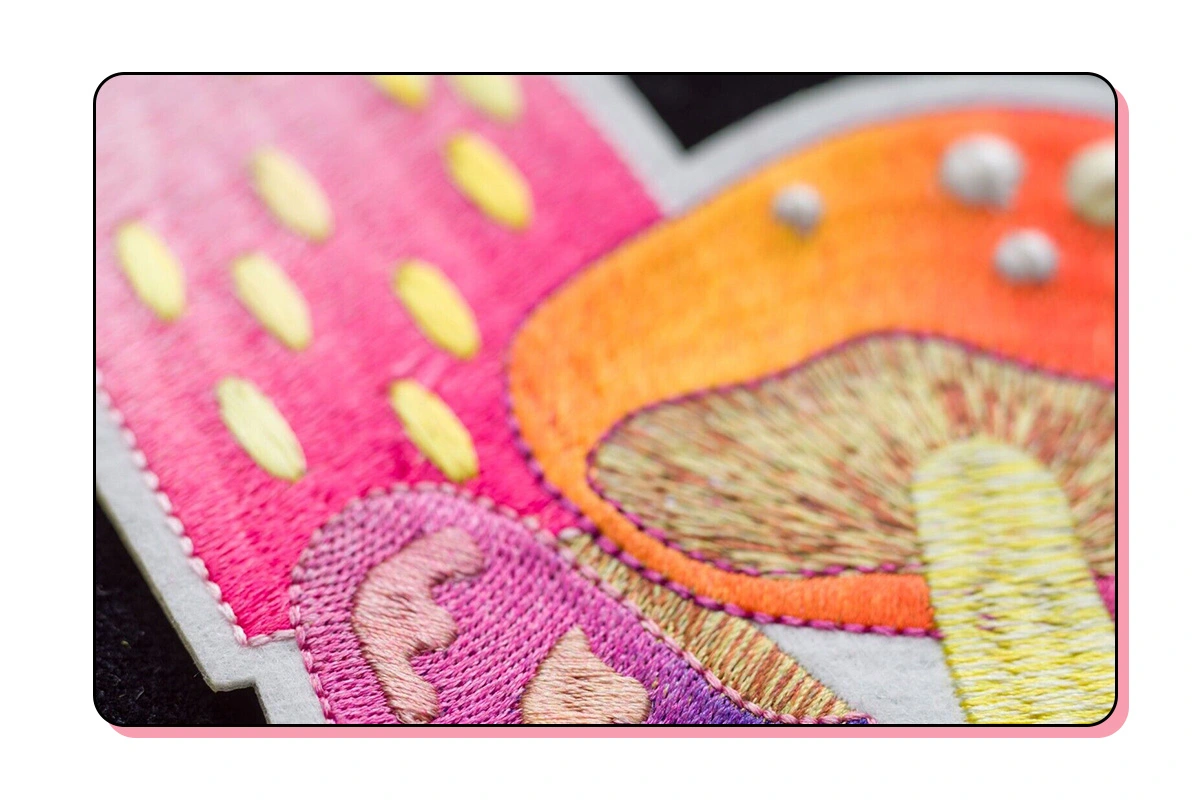
The possibilities are endless, and we're here to help you make the most of this exciting technology! Keep reading for our top five tips on creating vibrant embroidery designs with unlimited colours.
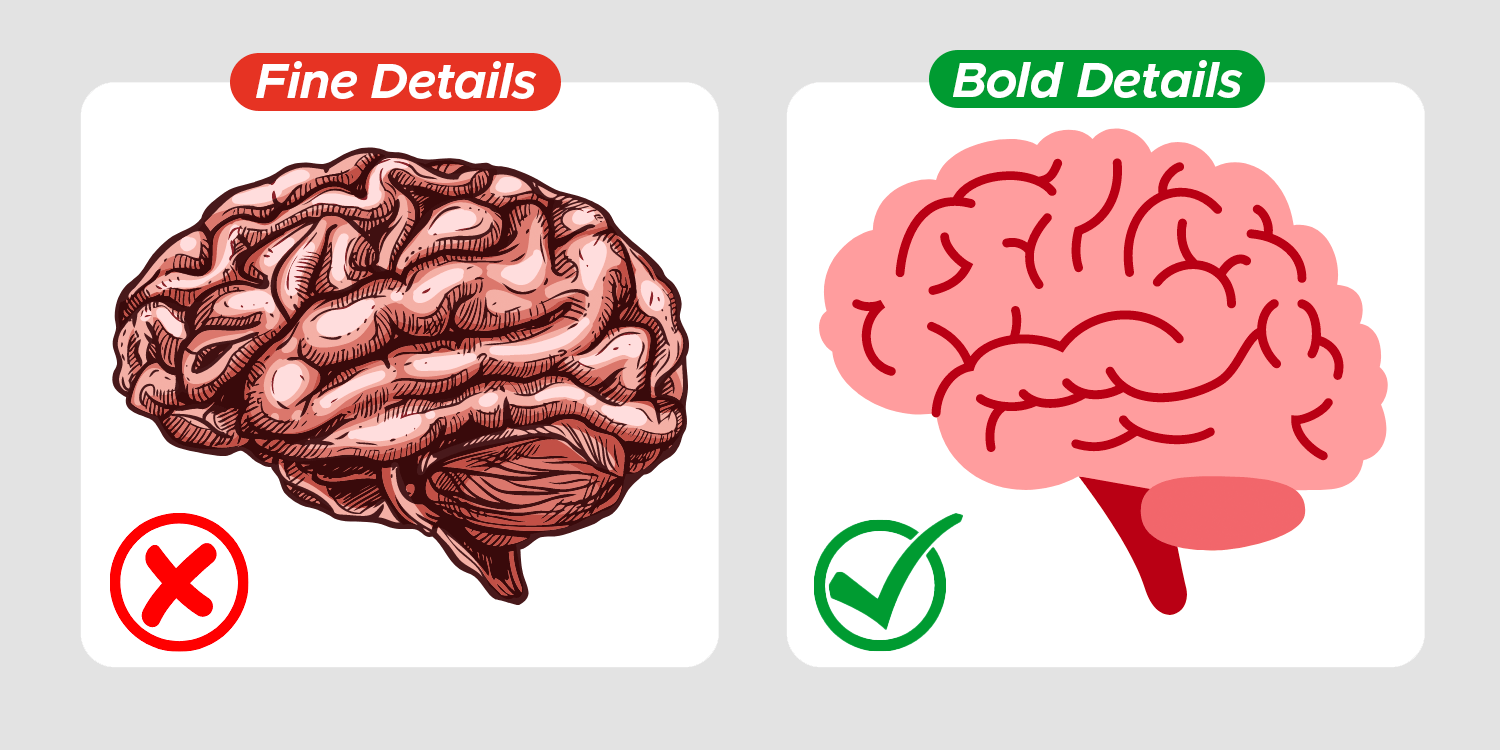
Tip 1 - Think Bold, Less is More
Just like with traditional embroidery, there's a limit to the level of detail we can stitch into your designs.
The golden rule when designing for any embroidery is to embrace bold lines and fewer details for a crisp, clean finish every time.
Think of it this way: designing for embroidery is like drawing with a Sharpie marker. Tiny details can't be re-produced with embroidery stitches, so stick with bold, broad strokes for the most visually appealing design.
Your line width needs to be at least 0.125cm, while text should stand tall at a minimum of 10pt or 0.35cm. Anything smaller might just disappear into the fabric, making your design look messy.
We're all about delivering smooth, clean embroidery that keeps your customers coming back for more. And the best way to achieve that is to keep your designs straightforward and BOLD.
If you're scratching your head wondering how to measure your designs, just open it in our embroidery PSD template (or a design window at 10x10cm, 300ppi) and use the selection tool to check the line widths.
To sum it up: go big on shapes and bold on lines for a design that's a visual treat.
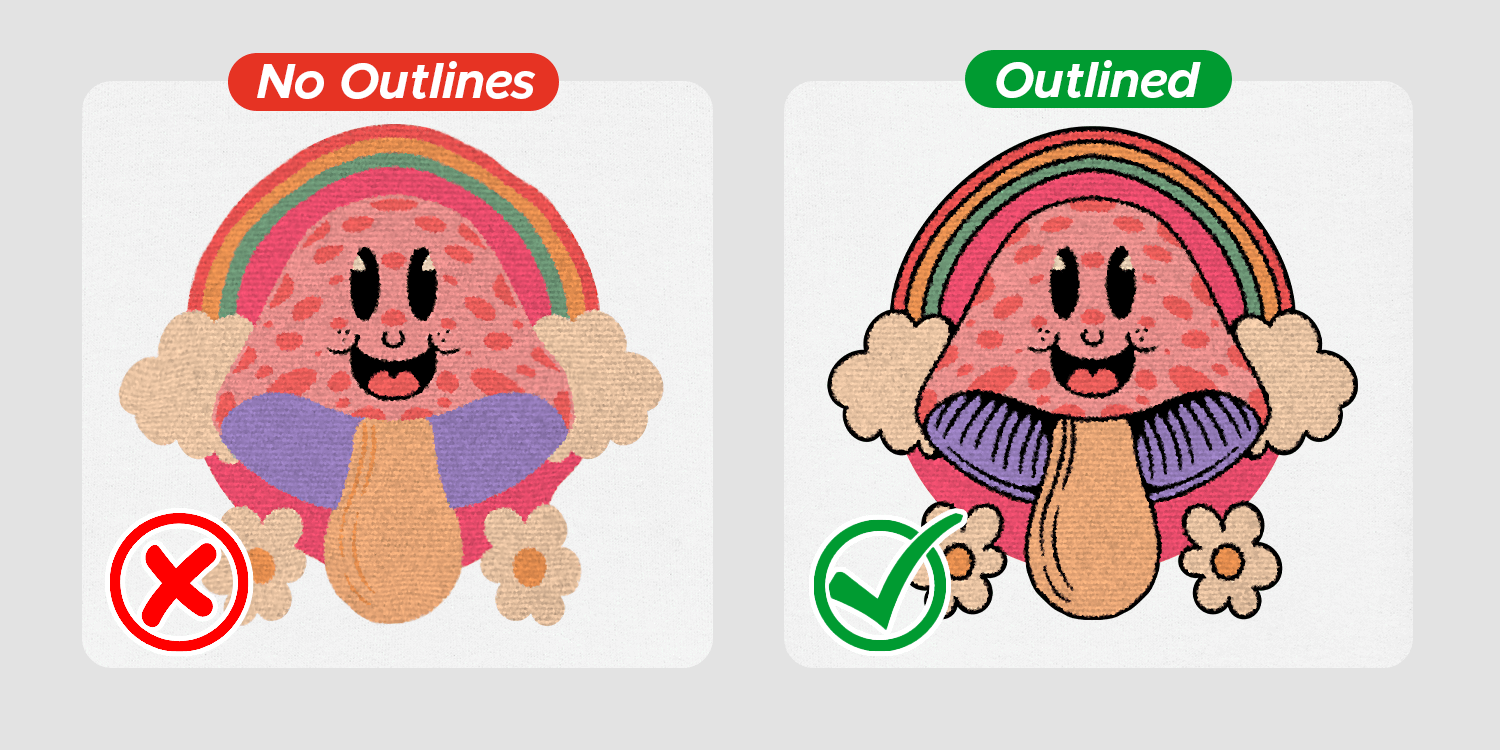
Tip 2 - Apply a Border
Outlines are your secret weapon when it comes to creating embroidery designs that not only last the lifetime of the garment but also make an impact on your customers. They add depth and dimension, making your designs truly stand out.
But there's more to outlines than just good looks. With unlimited colour embroidery, any colour changes in your design need to be cleverly hidden, and the perfect hideaway is within a nearby outline or a border.
Plus, outlines help to hold your design in place on the product, keeping it fixed and preventing it from warping over time. It's a win-win scenario: better durability and greater visual impact.
When in doubt, apply an outline or a border.
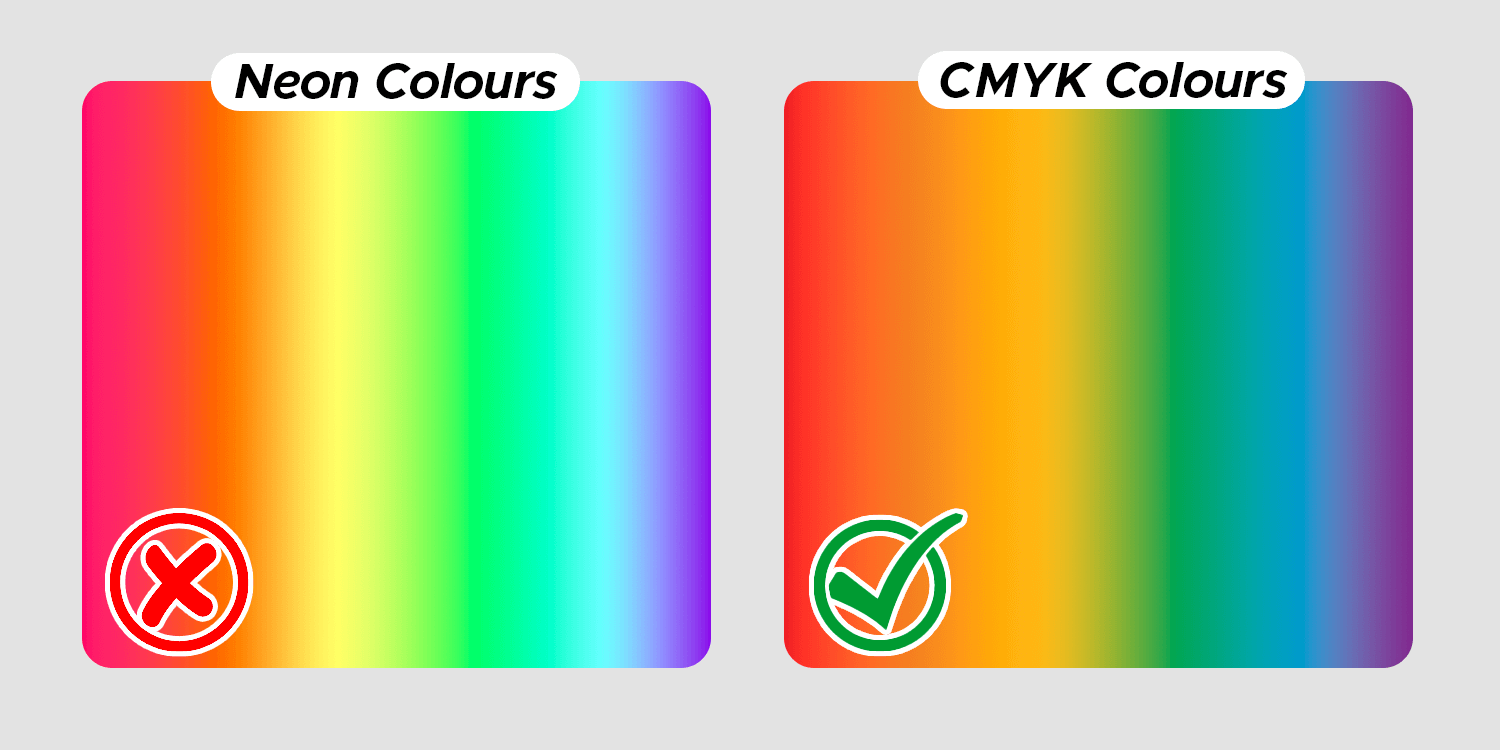
Tip 3 - Choose Print-Friendly Colours
Remember the technology behind unlimited colour embroidery? It uses ink to dye the thread on-the-go as your design is being embroidered, which means that the colours in your design file dictate the final colour output, similar to printing.
This means you'll need to be mindful about the colours you choose for your design file.
For the best-result, choose CMYK-friendly colours and steer clear of neon colours. They may look cool, but sadly, we can't work special effects into the mix.
When choosing the colours for your unlimited colour embroidery design, you can think of it like designing for DTG. Save and upload your designs in the sRGB colour profile. If you're a Photoshop user, enabling a CMYK colour gamut warning can be handy to ensure your colours fall within the ink gamut for vibrant final products.
Just remember, the colours you see on your screen exist in a different colour space compared to real-world inks. So, it's best to expect some slight variations in the final product.
Tip 4 - Use Linear Gradients
One of the most exciting things about this new embroidery service is the ability to use gradients. We've all dreamt of embroidering seamless rainbows and now, thanks to the latest technology, we finally can!
But before we dive into how to use gradients, let's cover a few key terms:
- A short colour gradient is a fast transition between hues of one colour. Such as, light blue fading to a deep blue.
- A long colour gradient is a slow colour change over a larger range of colours. Such as from red, to orange, to yellow, to green.
Gradients also differ in the direction of the colour transition. Some of the most common types of gradients include:
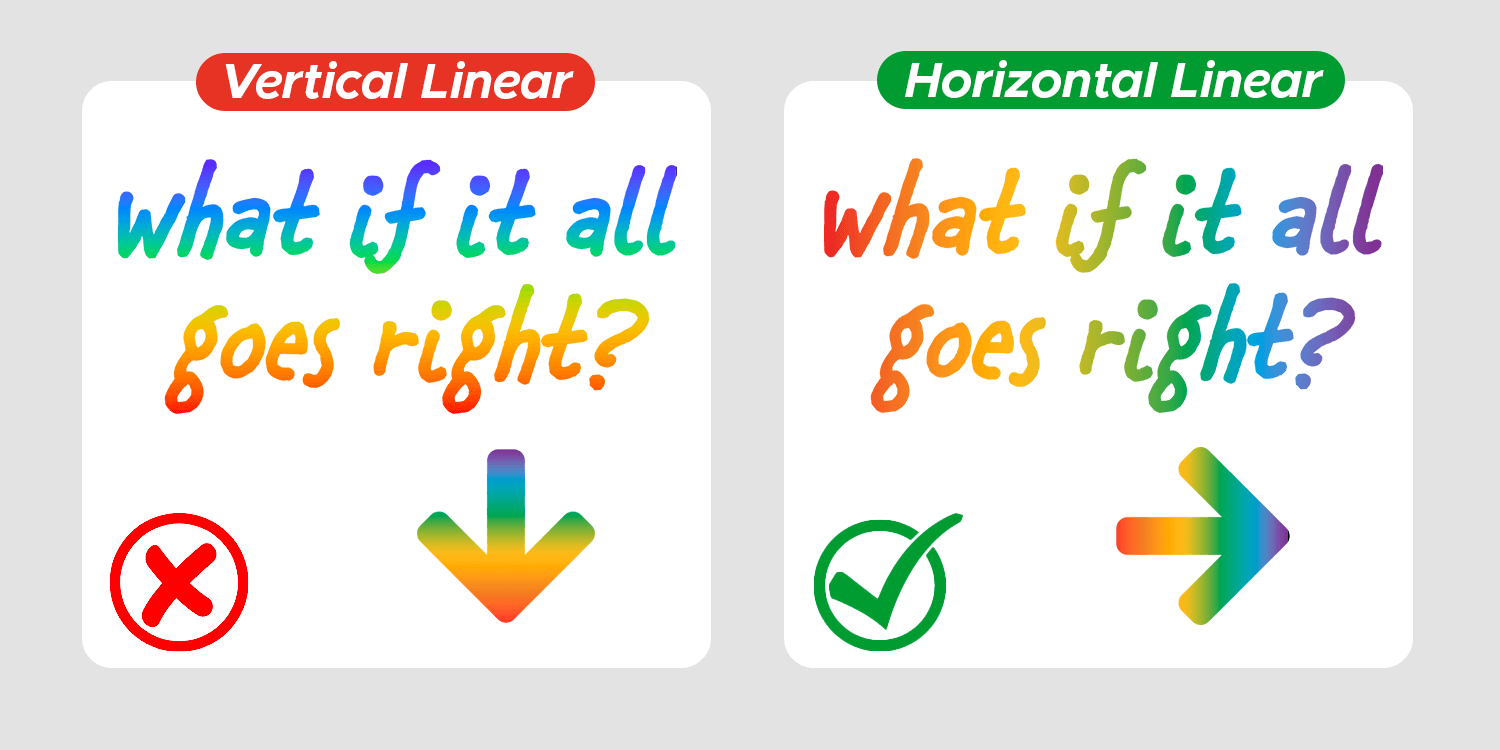
- Linear gradients, where the colour changes from one side of the design to the other, such as from left to right.
- Radial gradients change colour from the outside to the centre of the design.
- Halo gradients change colour in rings towards the centre of the design.
- Reflected gradients, where the colour changes linearly towardss the centre of the design and changes back to the original colour on the other side.
In our experience with unlimited colour embroidery, linear gradients have the best outcome and we'd recommend using that for that majority of your colour transitions.
When using a linear gradient on text, you should also consider that the gradient needs to be applied across the whole word, and not per letter. Your stitches will follow the orientation of the gradient, and with text, a horizontal gradient will always stitch better than a vertical one.
Keep in mind that your colour changes also needs to be at least 2cm wide for the colour transition to appear seamless.
For a short colour gradient you can achieve a seamless effect over the minimum 2cm width, whereas a long colour gradient will need a wider surface area to seamlessly change between multiple colours.
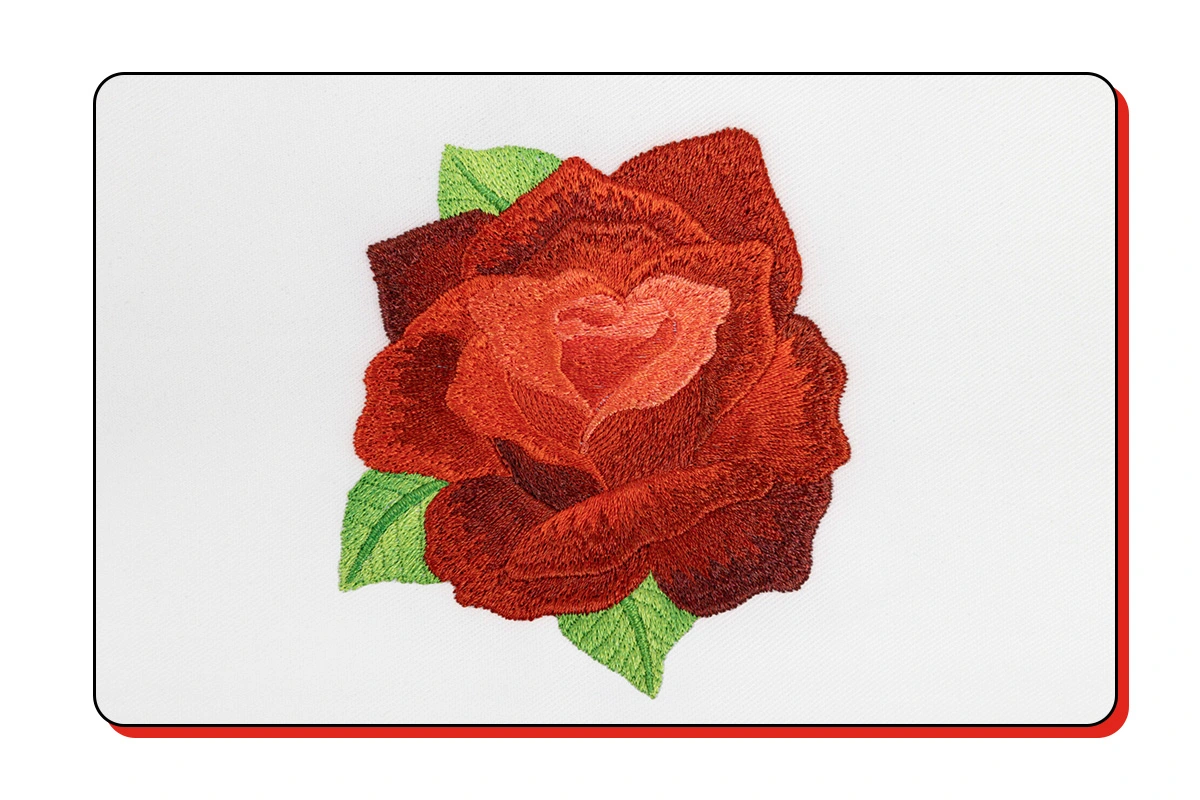
In the example below, we produced a long colour gradient with 6 colour changes over a design width of 10cm.
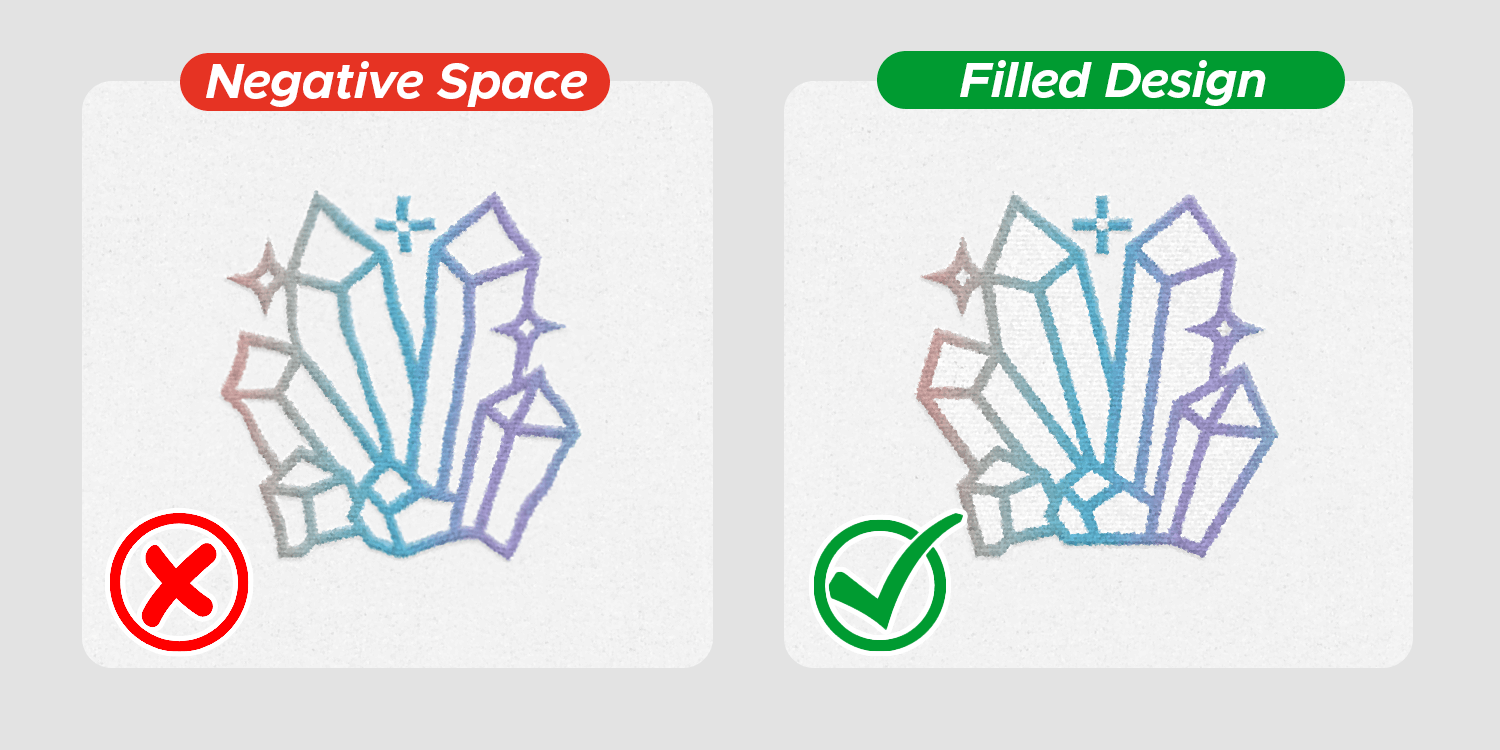
Tip 5 - Avoid Negative Space
Just like with standard embroidery, any empty spaces in your design where the fabric shows through can lead to deformities and an uneven appearance on the fabric surface.
We want your designs to be embroidered with the most clean and retail-ready finish, and by filling in any gaps, we'll be able to make your design with a crisp and professional finish every single time.
If you do need to include some negative space in your design for a specific effect or as part of a text-based logo, make sure the fabric is dense enough to support it. This means using a heavier weight product like a sweatshirt or a hoodie which will stabilise the embroidery.
Now that you know the basics, you're ready to create vibrant designs and the world of unlimited colours is at your fingertips!
To get started using this service, check out our full collection of products available with unlimited colour embroidery.
We're here to bring your designs to life, and once you place an order we'll be in touch to approve your design proof shortly after.
If you're new to Inkthreadable and need more information about our print-on-demand service, feel free to get in touch.
We can't wait to see what you design!
MEET INKTHREADABLE
We're a family-run business, but we pack a lot of punch! Our team is made up of expert printers, graphic designers and the most friendly customer support team you'll ever meet (we are from Lancashire, after all). Founded in 2013 by co-founders Alex & Amy, Inkthreadable has been built from the ground up. We've already fulfilled over 1.5 million orders, and we're ready to fulfil yours too!